
Learn how to use Kitchen Mama can opener the right way. Follow simple steps, avoid mistakes, and open cans safely. Read now.
The first time I used a Kitchen Mama can opener, I expected it to work like a regular opener. It did not. I spent a few minutes turning it the wrong way before I figured it out. Once I learned the process, opening cans became quick and easy. This guide will help you skip those beginner mistakes.
How to Use Kitchen Mama Can Opener?
Using a Kitchen Mama can opener is simple once you know the steps.
I use mine several times each week. It saves effort and works well for people who struggle with hand strength.
The basic process involves placing the opener correctly, pressing a button, and letting the device do the work.
Quick Steps
- Insert fresh batteries
- Place the opener on the can rim
- Press the start button
- Let the opener move around the can
- Wait for it to stop
- Remove the opener
- Lift the lid carefully
That is the basic process.
Now let us look at each step in more detail.
What Is a Kitchen Mama Can Opener?
Before using it, it helps to know how it works.
Unlike manual can openers, this device uses a battery-powered motor.
Why People Like It
Many users choose it because it:
- Requires little effort
- Works with one touch
- Helps reduce hand strain
- Cuts smoothly
- Feels easy to use
I first bought mine after a wrist injury. It made daily tasks much easier.
How It Differs from Manual Openers
Traditional can openers require hand pressure and turning.
A Kitchen Mama can opener works automatically.
You simply place it on the can and let it do the work.
That convenience is its biggest selling point.
Getting Ready Before You Start
A few checks help ensure smooth operation.
I always spend a few seconds preparing first.
Check the Batteries
Weak batteries often cause problems.
Before use:
- Open the battery compartment
- Check battery orientation
- Replace weak batteries
- Ensure contacts are clean
Most performance issues start here.
Inspect the Cutting Wheel
Look closely at the wheel.
Make sure:
- It is clean
- No food residue is present
- Nothing blocks movement
A clean wheel performs better.
Choose the Right Can
Most standard cans work well.
Very damaged cans may create issues.
Avoid cans with:
- Bent rims
- Deep dents
- Severe damage
These can affect alignment.
Step-by-Step Guide on How to Use Kitchen Mama Can Opener
This is the method I follow every time.
It takes only a few seconds.
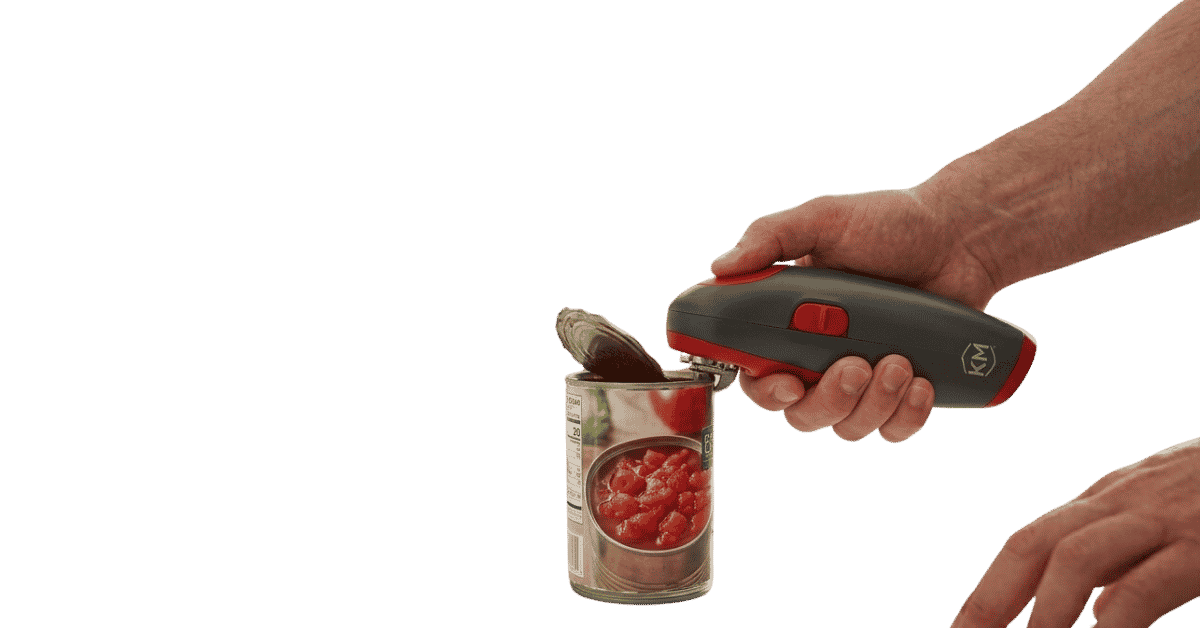
Position the Opener
Place the opener on top of the can.
The cutting wheel should align with the can rim.
Make sure the opener sits flat.
Proper placement is very important.
Press the Start Button
Once positioned:
- Press the button
- Release it
- Allow the opener to begin moving
The motor should start immediately.
You do not need to guide it.
Let the Opener Work
This part feels strange at first.
Many people want to hold or steer it.
Do not.
The opener travels around the can automatically.
I made that mistake during my first use.
The opener works best when left alone.
Wait for Completion
As the opener moves around the can:
- Listen for smooth operation
- Avoid touching moving parts
- Allow it to finish fully
Most cans take less than a minute.
Remove the Opener
When finished:
- Lift the opener gently
- Set it aside
- Inspect the lid
The can should now be open.
Lift the Lid Carefully
The lid may remain attached lightly.
Use caution.
Even smooth-cut lids deserve careful handling.
Common Mistakes When Using a Kitchen Mama Can Opener
Many first-time users experience similar issues.
I certainly did.
Incorrect Placement
Poor alignment is the most common mistake.
Symptoms include:
- Wheel slipping
- Incomplete cuts
- Failure to start
Always check positioning first.
Weak Batteries
Low battery power causes:
- Slow movement
- Stalling
- Incomplete cutting
Fresh batteries often solve the problem.
Trying to Guide the Opener
The device is designed to move independently.
Resist the urge to push it.
Let it travel on its own.
Using Damaged Cans
Severely dented cans may affect performance.
Whenever possible, choose cans with smooth rims.
Kitchen Mama Can Opener Features Comparison
Understanding the features helps you use the device better.
| Feature | Benefit |
|---|---|
| One-Touch Operation | Easy for beginners |
| Battery Powered | No manual turning needed |
| Automatic Movement | Hands-free operation |
| Compact Design | Easy storage |
| Smooth Edge Cutting | Improved safety |
| Lightweight Build | Comfortable handling |
These features are why many people switch from manual openers.
Tips for Better Results
Small habits improve performance.
I use these tips regularly.
Keep the Wheel Clean
Food residue builds up over time.
Clean regularly to help:
- Improve grip
- Maintain smooth cuts
- Extend lifespan
Store in a Dry Place
Moisture can affect battery compartments.
Good storage locations include:
- Kitchen drawers
- Dry cabinets
- Pantry shelves
Avoid damp areas.
Replace Batteries Early
Do not wait until the opener struggles.
Fresh batteries provide:
- Better power
- Faster operation
- More reliable cuts
Practice with Standard Cans
If you are new to the device, start with common food cans.
They provide the easiest learning experience.
Troubleshooting Common Problems
Even good devices encounter occasional issues.
Most are easy to fix.
The Opener Will Not Start
Possible causes:
- Dead batteries
- Incorrect battery installation
- Dirty contacts
Check batteries first.
The Wheel Slips
This usually happens because of:
- Poor placement
- Dirty wheel
- Damaged can rim
Realign and try again.
The Opener Stops Midway
Common causes include:
- Weak batteries
- Debris buildup
- Mechanical resistance
Cleaning and fresh batteries often help.
Strange Noises During Operation
Grinding sounds may indicate:
- Dirt buildup
- Obstruction
- Component wear
Inspect the wheel carefully.
How to Clean a Kitchen Mama Can Opener
Good cleaning habits improve performance.
I clean mine every few weeks.
Basic Cleaning Steps
- Remove batteries if needed.
- Wipe exterior surfaces.
- Clean the wheel area.
- Dry completely.
Simple cleaning prevents many issues.
Deep Cleaning Tips
For deeper cleaning:
- Use a soft cloth
- Remove visible residue
- Avoid excess water
- Allow full drying
This helps maintain smooth operation.
What to Avoid
Do not:
- Submerge the opener
- Use harsh chemicals
- Scrub aggressively
These actions may damage components.
Why I Prefer the Kitchen Mama Can Opener
After years of use, I still appreciate its convenience.
Some days my hands feel tired after cooking.
On those days, a battery-powered opener feels like a small luxury.
The ease of use stands out.
I press one button and the opener does the work.
That simplicity is hard to beat.
Safety Tips While Using a Kitchen Mama Can Opener
Safety should always come first.
A few simple habits help.
Keep Fingers Clear
Avoid touching:
- The cutting wheel
- Moving parts
- The can edge during operation
Supervise Children
This is not a toy.
Store it safely when not in use.
Inspect Before Each Use
Quick inspections help identify:
- Damage
- Loose parts
- Battery issues
A few seconds of checking can prevent problems.
FAQs
How do I start using a Kitchen Mama can opener?
Place the opener on the can rim, press the button, and let it move around the can automatically. No manual turning is needed. Learn more about setup.
Why is my Kitchen Mama can opener not cutting the can?
Poor alignment, weak batteries, or a dirty wheel often cause cutting issues. Check these areas first. Learn more about troubleshooting.
Can I use a Kitchen Mama can opener on all cans?
Most standard cans work well. Very dented or damaged cans may cause alignment issues and affect performance. Learn more about can selection.
How often should I clean my Kitchen Mama can opener?
Clean the wheel and exterior regularly to prevent buildup and maintain smooth operation. Routine care helps improve lifespan. Learn more about cleaning.
Is the Kitchen Mama can opener safe to use?
Yes. When used correctly, it offers safe and simple operation. Keep fingers away from moving parts and inspect it regularly. Learn more about safety.