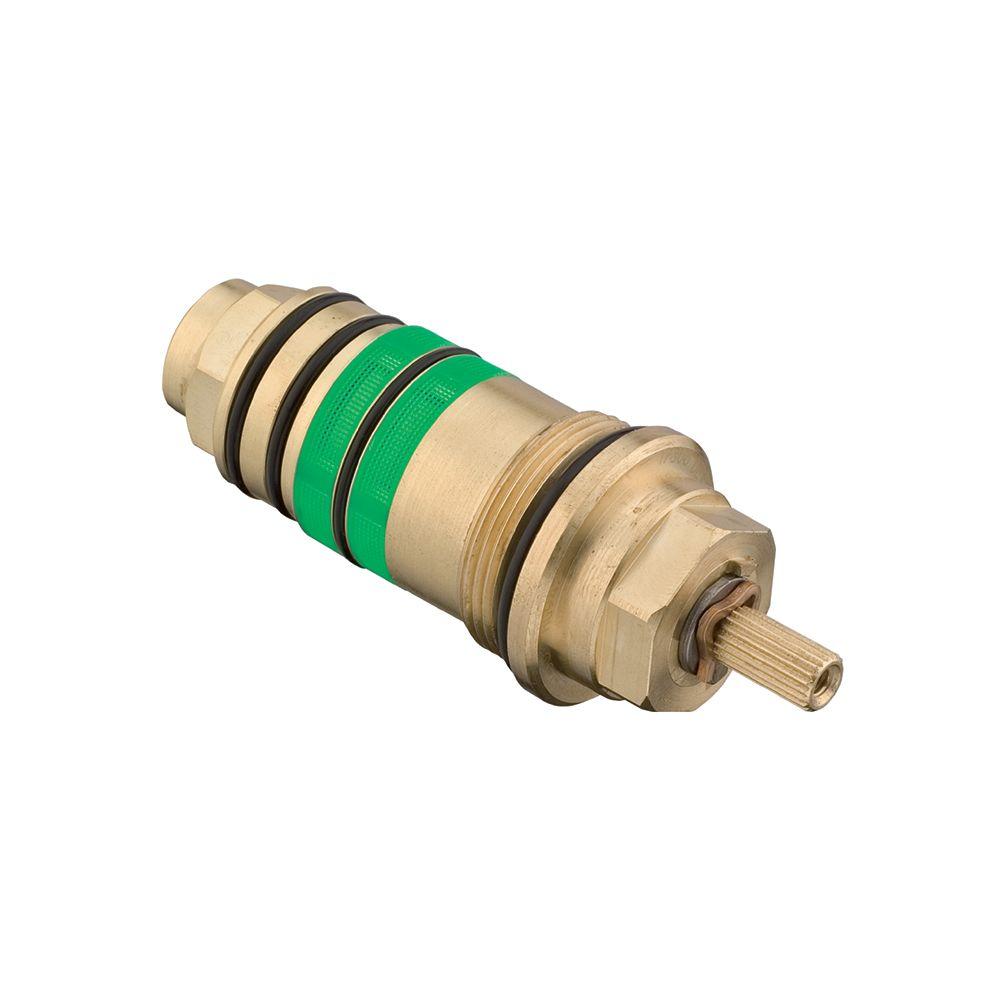
A hansgrohe kitchen faucet cartridge controls water flow and, in many single-handle faucets, the mix of hot and cold water. To replace it, identify your exact faucet model, find its matching cartridge part number, shut off the water, and follow the correct service instructions.
A dripping kitchen faucet can waste time and make a mess around the sink. In a US home, the cause might be a worn cartridge, a loose connection, mineral buildup, or a damaged seal. Replacing the cartridge can help, but only when that part is the source of the problem.
Hansgrohe makes several kitchen faucet designs, and their internal parts are not all the same. A cartridge that fits one model may not fit another, even when the parts look alike. The safest way to choose a replacement is to check the faucet model and the official parts information before buying anything.
This guide explains how to identify a Hansgrohe cartridge, recognize common signs of failure, and prepare for replacement. It also covers water shutoff, removal, installation, and the problems that can arise after a repair. The steps are general guidance, so use the service instructions for your exact faucet whenever they differ.
A faucet cartridge is an internal part that helps control water flow. In many single-handle Hansgrohe kitchen faucets, moving the handle changes the cartridge position. That movement controls how much water flows and how hot or cold the mixed water becomes.
Many modern faucet cartridges use ceramic discs or other closely fitted internal surfaces to regulate water. These parts are designed to move in a controlled way while limiting unwanted water flow when the faucet is closed. The exact design depends on the faucet model.
A cartridge is not the same as an aerator. The aerator sits at the water outlet and helps shape the stream. A cartridge sits inside the faucet body and controls the water before it reaches the spout. Knowing this difference can help you avoid replacing the wrong part.
Source: amazon.com
Water flow control
The cartridge opens, closes, or adjusts the path through which water moves inside the faucet.
Temperature control
On many single-handle designs, the cartridge helps set the balance of hot and cold water as the handle moves.
Handle movement
Wear, deposits, or internal damage may make the handle harder to move or less precise.
Leak prevention
The cartridge and its related seals help control water flow, although leaks can also come from separate seals, hoses, or connections.
Ceramic Cartridges and Other Internal Designs
Ceramic cartridges use hard, smooth surfaces that slide against each other to regulate water. A cartridge can still become difficult to operate or stop sealing well if a part wears, becomes damaged, or collects deposits. The visible shape alone does not confirm the cartridge type or its compatibility.
Some Hansgrohe faucet families use different cartridge designs and part numbers. A ceramic cartridge listed for a bathroom faucet, for example, should not be assumed to fit a kitchen faucet. Match the part to the exact model and the correct parts diagram.
Do not buy by appearance alone
Compare the model number, part number, dimensions, mounting arrangement, and any manufacturer compatibility notes.
A cartridge may include or require separate seals, clips, or retaining parts. Confirm what the replacement package contains.
How to Identify the Correct Hansgrohe Cartridge
The correct replacement starts with the faucet model, not a guess based on the old cartridge. A number printed on the cartridge can help, but it may be hard to read or may identify only one internal component. Use the faucet’s full model information to confirm the replacement part.
Hansgrohe sells different faucet collections, and parts can vary by model and production version. A replacement that looks close may have a different stem length, base shape, seal arrangement, or mounting method. Even a small difference can prevent proper installation or cause the faucet to leak.
Source: bestonlinecollegesdegrees.com
Find the model information
Check the original paperwork, product packaging, purchase records, or any product label supplied with the faucet. If those are unavailable, consult Hansgrohe support about identifying the model.
Use the official parts information
Look up the model in Hansgrohe’s official product or spare-parts resources for your market. Confirm the cartridge part number and any notes about model revisions.
Compare the old part
After safe removal, compare the old cartridge with the confirmed replacement. Check the stem, base, locating tabs, seals, and retaining features.
Confirm the package contents
Check whether the cartridge comes with the seals or accessories needed for the repair. Do not assume that every kit contains the same parts.
What If the Faucet Model Is Unknown?
Start by taking clear photographs of the faucet from the front, side, and top. Include the handle, spout, base, and any visible markings. These images may help manufacturer support or a plumbing-parts supplier narrow down the model.
If you remove the cartridge, photograph it from several angles and record any numbers stamped or printed on it. Measure only the features needed for identification, and do not treat measurements alone as proof of compatibility. Ask Hansgrohe support to confirm the correct part when the model remains uncertain.
Avoid a trial-and-error purchase
Ordering several similar cartridges can cost more than confirming the model before buying.
Keep the old cartridge
If it is safe to retain, keep it until the new part is installed and the faucet has been checked for leaks.
Signs That Your Faucet Cartridge May Need Replacement
A faulty cartridge can cause a faucet to drip, leak around the handle, or respond poorly when you adjust the water. However, none of these symptoms proves that the cartridge has failed. Check the location of the leak and rule out simpler causes before taking the faucet apart.
The most useful clue is often when the problem occurs. A faucet that drips from the spout after the handle is fully closed may have an internal sealing problem. Water appearing around the handle may come from a cartridge seal or another part inside the faucet. Water under the sink usually points to a different set of possible causes.
Source: manuals.plus
Water keeps dripping from the spout
If the faucet continues to drip after it is fully closed, the cartridge or its sealing surfaces may not be closing properly. Debris or another internal fault can cause a similar symptom.
The handle feels stiff or rough
Mineral deposits, damaged internal parts, or a problem with the handle assembly may make movement difficult. Do not force the handle to turn.
The water temperature is hard to control
A worn or damaged cartridge may affect mixing, but a restricted supply line or a problem with the hot-water supply can also cause temperature changes.
The handle moves without normal control
The cartridge stem, handle screw, or other control parts may be loose or damaged. Inspect the assembly before assuming the cartridge needs replacement.
Water leaks near the handle
A damaged seal or cartridge may be responsible. The exact leak path and faucet design determine which part needs attention.
When the Cartridge Is Probably Not the Problem
Low water flow may come from a clogged aerator, a kinked hose, a partially closed shutoff valve, or debris in the supply. If both hot and cold flow are weak, check the shared outlet and supply conditions before replacing internal parts.
A leak under the sink can come from a supply hose, shutoff valve, connection, or pull-down hose. Dry the area and observe where fresh water first appears. Never reach into a wet area near electrical equipment, and arrange qualified help if the leak is difficult to locate or control.
If the water is discolored or the problem affects several fixtures, the cause may lie in the home’s plumbing or water supply rather than the faucet cartridge. A cartridge replacement is unlikely to solve a broader supply issue.
Check the aerator
If the flow is weak but the handle works normally, inspect the outlet aerator according to the faucet instructions.
Check both shutoff valves
Confirm that the hot and cold supply valves are open and that the hoses are not visibly kinked or crushed.
Locate the first wet spot
The place where water first appears can help distinguish an internal faucet leak from a hose or connection leak.
Tools and Supplies Needed for Cartridge Replacement
Most cartridge repairs need only a few basic tools, but the exact list depends on the faucet model. Read the service instructions before starting so you know how the handle, retaining hardware, and cartridge are secured. Some designs use a hidden set screw, while others have different access or retaining arrangements.
Set up a clear work area around the sink. A small screw or clip can disappear into the drain or cabinet, so close the drain and keep removed parts in a tray. Place a towel beneath the faucet to catch small amounts of water.
Source: manuals.plus
Correct replacement cartridge
Use the confirmed part number for your exact faucet model and market.
Appropriate hand tools
Prepare the screwdriver, hex key, or wrench specified by the manufacturer. The wrong size can damage a screw or retaining nut.
Soft cloth and towel
Protect the faucet finish and absorb residual water during disassembly.
Small parts tray
Keep screws, clips, washers, and other pieces in the order in which they were removed.
Flashlight
A light helps you see the handle fastener, retaining hardware, and cartridge alignment marks.
Should You Use Plumber’s Grease?
Use lubricant only when the faucet manufacturer calls for it and specifies a compatible type. Some seals and cartridge materials can be damaged by an unsuitable product. Do not apply grease to ceramic surfaces or water passages unless the service instructions expressly permit it.
Never use household oil, penetrating spray, or an unapproved lubricant as a shortcut for a stiff cartridge. If the part is stuck, first confirm that all retaining hardware has been removed and follow the model-specific removal method.
Follow the service instructions
Use only approved lubricant on the parts and locations specified by the manufacturer.
Avoid excess force
A cartridge that will not move may still have a retaining clip, nut, or other fastener in place.
How to Replace a Hansgrohe Kitchen Faucet Cartridge
Replace the cartridge only after confirming the correct part and reading the service instructions for your faucet. The sequence below describes a common single-handle faucet repair, but handle fasteners, retaining hardware, and cartridge orientation can vary. Follow the model-specific procedure whenever it differs from these general steps.
The key is to keep water shut off, preserve the position of small parts, and avoid damaging the faucet body. If the cartridge is corroded in place, the retaining hardware will not loosen, or the faucet body begins to move, stop rather than forcing the assembly.
Make sure you have the correct cartridge, suitable tools, clear access to both shutoff valves, and enough light to see the internal parts.
Step 1: Shut Off the Hot and Cold Water
Find the hot and cold shutoff valves beneath the kitchen sink. Close both valves according to their design, without forcing an old or corroded valve. If the valves are stuck, leaking, or badly corroded, have a plumber address them before opening the faucet.
Open the faucet handle to release pressure and confirm that the water supply has stopped. Some water may remain in the spout or hoses. If water continues to flow steadily, stop and shut off the supply at a safe upstream valve or the home’s main valve if appropriate.
Verify the shutoff
Do not remove the cartridge while the faucet remains under water pressure.
Step 2: Protect the Sink and Close the Drain
Place a towel around the faucet base and close the sink drain. These simple steps help prevent scratches and keep tiny parts from falling into the plumbing. Clear the cabinet below the sink if you need access to the supply valves or connections.
Keep parts organized
Use a small tray or take photos as each component comes off.
Step 3: Remove the Handle
Locate the handle’s fastening point. Depending on the model, it may be hidden beneath a cap or placed in a recessed opening. Use the correct tool to loosen the fastener, then lift the handle away as directed by the service instructions.
Do not pry against the finished faucet body with a metal screwdriver. If the handle will not lift, check for another fastener or a design-specific release method. A stuck handle may need a model-appropriate puller or professional service rather than extra force.
Preserve the original position
Photograph the handle orientation and any visible spacers before removing them.
Step 4: Remove the Cartridge Retainer
With the handle removed, identify the hardware that holds the cartridge in place. It may be a retaining nut, screw, clip, or another component, depending on the faucet design. Remove only the parts identified in the service instructions.
Keep track of the order and direction of every washer, spacer, or clip. Do not assume that a retaining nut should be turned with a particular tool or that every model uses the same arrangement. If the hardware is seized, stop before damaging the faucet body.
Do not force the retainer
Use the specified tool and removal method. Damaged threads or a cracked faucet body can turn a small repair into a larger job.
Step 5: Lift Out the Old Cartridge
Once the retaining hardware is fully removed, pull the cartridge out using the method specified for your faucet. Some cartridges lift out by hand, while others may require a particular removal technique. Keep the faucet body steady and avoid twisting parts that are not designed to rotate.
Inspect the old cartridge for cracks, damaged seals, heavy deposits, or worn areas. These observations may help explain the problem, but appearance alone cannot confirm every internal fault. Take photographs and record any markings before discarding the old part.
Stop if it is stuck
Check for a hidden clip or fastener and consult the model instructions. Do not hammer the cartridge or grip finished surfaces with bare metal pliers.
Step 6: Inspect and Clean the Cartridge Housing
Look inside the cartridge opening for loose debris, mineral deposits, damaged threads, or signs of corrosion. Remove loose dirt only with a method and material suitable for the faucet. Avoid scratching the housing or pushing debris deeper into the water passages.
Do not use strong acids, abrasive pads, or harsh chemical cleaners unless the manufacturer specifically approves them for the affected part. If the housing is cracked, badly corroded, or damaged where the cartridge seals, installing a new cartridge may not solve the leak.
Check the sealing area
The housing must be clean and intact where the replacement cartridge sits and seals.
Step 7: Install the Correct Replacement
Compare the new cartridge with the old one before installation. Confirm the part number, stem shape, base, locating features, and seals. Even if the two parts look alike, use the manufacturer’s compatibility information to confirm that the replacement is correct.
Align the cartridge with the locating features in the faucet body. Install it in the required orientation, making sure that seals are seated and no part is pinched or folded. Do not rotate or force the cartridge to make it fit if its shape or alignment does not match.
Reinstall the retaining hardware in the correct order. Tighten it according to the manufacturer’s instructions. If a specified torque is provided, use that value rather than guessing. Overtightening can damage the cartridge, seals, threads, or faucet body.
Match the original alignment
Incorrect cartridge orientation can affect handle movement or hot and cold control.
Use the correct fasteners
Do not substitute a different screw, clip, or nut unless the manufacturer approves it.
Step 8: Reinstall the Handle
Put the handle and any spacers or covers back in the correct positions. Secure the handle with its original fastener or the specified replacement hardware. Check that the handle moves through its intended range without binding before restoring the water supply.
If the handle sits crooked, catches, or feels much tighter than before, do not try to correct the problem by forcing it. Recheck cartridge alignment, the order of the parts, and the handle fastener.
Check movement first
The handle should move as designed without unusual resistance or loose movement.
Step 9: Restore Water and Test for Leaks
Open the shutoff valves slowly. Check the faucet base, handle area, and accessible supply connections for leaks. Operate the handle through its normal range and confirm that the water turns on and off as expected.
Let the water run long enough to check hot and cold operation and observe the stream. If the faucet has a pull-down spray head, test its normal functions as well. Follow the manufacturer’s instructions for flushing the faucet after service, especially if debris may have entered the water passages.
Close the faucet and watch the spout for continued dripping. If water leaks from the handle or base, shut off the supplies again before inspecting the assembly. A fresh leak after replacement may indicate a pinched seal, incorrect cartridge, damaged housing, or loose connection.
Success looks like normal control
The faucet should open, close, and mix water as intended, with no new leaks around the handle or base.
Recheck after use
Inspect the cabinet and visible connections again after the faucet has run. A small leak can take time to appear.
Troubleshooting Common Cartridge Problems
If the faucet still does not work properly after a cartridge replacement, avoid taking the whole assembly apart at once. Start with the symptom, check the simplest likely cause, and shut off the water before opening any pressurized component. A second replacement cartridge is not always the answer.
The table below links common symptoms to possible causes and sensible next steps. These are troubleshooting clues, not definitive diagnoses, because faucet designs and plumbing conditions vary.
Source: ipipeline.net
The Faucet Still Drips After Replacement
A continuing drip may mean the replacement cartridge is incorrect, not seated properly, or damaged during installation. Debris in the housing or a damaged sealing surface can also prevent a tight closure. Verify the part number and installation instructions before removing the cartridge again.
If the cartridge is confirmed correct and properly installed, inspect the remaining components identified in the model’s service diagram. A cracked housing or damaged internal surface may require a larger repair or faucet replacement.
First check
Confirm the cartridge number, orientation, seating, and retaining hardware.
The Handle Is Stiff After Installation
A stiff handle may point to incorrect alignment, a pinched seal, a retaining component that is too tight, or an incompatible cartridge. It may also indicate a problem with the handle assembly itself. Do not keep moving the handle with extra force, since this can damage internal parts.
Shut off the water and inspect the assembly according to the manufacturer’s instructions. Confirm that the correct parts are in place and that no component is binding. Use lubricant only if it is approved for the exact location.
Avoid forcing movement
Unusual resistance is a reason to inspect the assembly, not a reason to apply more force.
Hot and Cold Water Are Reversed
Reversed temperature control may result from cartridge orientation, supply connections, or a design-specific setup issue. Check the faucet’s installation and service instructions to determine the correct orientation and supply arrangement.
Do not assume that every cartridge can be rotated to fix the problem. Some cartridges have locating features that allow only one proper position, while other models have specific instructions for temperature-control adjustment.
Verify the model instructions
Check the approved cartridge orientation and the hot and cold supply connections before making another change.
Water Flow Is Weak or Uneven
Weak flow after a repair may come from debris disturbed during service, a blocked aerator, a kinked pull-down hose, or a partly closed shutoff valve. Check the outlet and accessible supply lines before assuming that the cartridge is defective.
If one temperature has weak flow but the other works normally, the restriction may affect only one supply path. Follow the model’s service instructions for checking screens or passages, and avoid dismantling components that are not intended for user service.
Check easy causes first
Inspect the aerator, shutoff valves, and visible hoses for a clear and safe path for water.
The Cartridge Will Not Come Out
A stuck cartridge may have mineral deposits, corrosion, or a retaining component that has not been removed. Recheck the service diagram and confirm that every required clip, nut, or screw has been released.
Do not hammer the cartridge, pry against the faucet finish, or clamp the faucet body in a way that could deform it. If the specified removal method does not work, contact Hansgrohe support or a qualified plumber. Damage to the body can make the repair much more costly.
Stop before damage occurs
A stubborn cartridge is a reason to use the correct model-specific removal method or seek professional help.
Cartridge Replacement Cost and Repair Decisions
The cost of a Hansgrohe cartridge repair depends on the exact part, availability, shipping, and whether you do the work yourself or hire a plumber. There is no single price that applies to every model. Check the current price of the confirmed cartridge and ask for a labor estimate if professional service is needed.
A DIY repair may reduce labor costs when the shutoff valves work, the cartridge is accessible, and the service procedure is clear. A plumber may be the better choice if the faucet is stuck, the valves are corroded, the connections leak, or the repair requires special tools. Include the risk of damaging an older faucet when comparing costs.
Source: Amazon.ca
DIY repair
May suit someone who can identify the correct part, safely shut off the water, and follow the model-specific instructions.
Professional repair
Can be useful when the cartridge is seized, access is poor, the water supply cannot be shut off safely, or the faucet body may be damaged.
Full faucet replacement
May be worth comparing when the faucet has several failing components, replacement parts are unavailable, or the body is badly corroded or cracked.
Should You Replace the Cartridge or the Whole Faucet?
A cartridge replacement is often the more direct option when the faucet body and other components remain in good condition and the correct cartridge is available. A new cartridge will not fix a cracked faucet body, badly damaged threads, or a failing supply hose.
Compare the full repair cost with the cost of a suitable replacement faucet, including installation, required connections, and any changes to the sink setup. Consider whether the existing faucet has other problems and whether replacement parts are likely to remain available. There is no need to replace a sound faucet solely because one serviceable internal part has failed.
Repair when the fault is limited
A confirmed cartridge problem in an otherwise sound faucet may justify replacing that part alone.
Compare options when damage is broader
A damaged body, recurring leaks, or multiple failing parts may make full replacement more practical.
How to Maintain a Hansgrohe Kitchen Faucet Cartridge
Routine care can help keep the faucet handle easy to operate and make leaks easier to spot. It cannot prevent every cartridge failure, but gentle cleaning and prompt attention to unusual behavior can reduce avoidable damage.
Clean the faucet exterior with a soft cloth and a cleaner approved for its finish. Avoid abrasive pads and harsh chemicals that may damage the surface. Do not pour cleaning agents into the handle opening or cartridge housing as a maintenance shortcut.
If the handle begins to feel rough, the water control changes, or the faucet starts to drip, investigate the cause early. A small problem with an aerator or supply connection may be easier to address than a repair delayed until a part is badly damaged.
Source: ipipeline.net
Clean the outlet when needed
A clogged aerator can affect flow and may be easier to service than the cartridge. Follow the instructions for your faucet.
Avoid forceful handle movement
A handle that suddenly becomes stiff needs inspection rather than extra pressure.
Watch for small leaks
Check the handle area, faucet base, and cabinet below the sink when you notice a change in operation.
Use compatible cleaning products
Follow the manufacturer’s finish-care advice and keep harsh chemicals away from internal parts.
Does Hard Water Damage the Cartridge?
Hard water contains dissolved minerals that can leave deposits on plumbing fixtures. Those deposits may affect outlet screens and moving parts, depending on the water conditions and faucet design. A stiff handle or weak stream does not prove that mineral buildup is the cause.
If deposits are a recurring problem, clean the faucet and aerator using the method approved for the model. Do not soak the cartridge in vinegar or another descaling solution unless the manufacturer specifically permits it. Some materials, seals, and finishes can be harmed by unsuitable cleaners.
Treat the source of the symptom
Clean an affected aerator when appropriate, and replace a cartridge only when diagnosis and the service information support that repair.
Frequently Asked Questions
Q
How do I know which Hansgrohe kitchen faucet cartridge I need?
Find the exact faucet model and use Hansgrohe’s official parts information to identify the compatible cartridge. Check any part number on the old cartridge as supporting information, then confirm the replacement’s fit and installation requirements. Do not rely on appearance alone.
Q
Can I replace a Hansgrohe cartridge myself?
Many homeowners can replace a cartridge if the correct part is available, the shutoff valves work, and the service procedure is clear. You will usually need basic hand tools and a safe way to stop the water supply. Contact a plumber if the cartridge is stuck, the shutoff valves are damaged, or the faucet body shows signs of corrosion or cracking.
Q
Why does my Hansgrohe faucet drip after I replace the cartridge?
The cartridge may be incompatible, incorrectly seated, damaged, or installed in the wrong orientation. Debris or damage inside the cartridge housing may also prevent proper sealing. Shut off the water, verify the part number, and check the manufacturer’s installation instructions before trying again.
Q
Can I clean a Hansgrohe cartridge instead of replacing it?
That depends on the cartridge design and the cause of the problem. Loose debris or deposits may be addressed through an approved service method, but worn or damaged internal parts may require replacement. Do not soak the cartridge in a cleaning solution or lubricate its internal surfaces unless Hansgrohe approves that method for the exact model.
Q
How much does a Hansgrohe kitchen faucet cartridge cost?
The price varies by cartridge model, seller, availability, and market. Check the current price for the exact part number rather than using the cost of a similar-looking cartridge as a guide. If you hire a plumber, ask for an estimate that separates the part cost from labor and any additional repairs.
Q
What should I do if the cartridge is stuck?
Confirm that the water is off and that all required retaining hardware has been removed. Follow the removal method for the exact faucet model, and avoid hammering or prying against the finished body. If the cartridge will not move without excessive force, seek help from Hansgrohe support or a qualified plumber.
Q
Does a Hansgrohe kitchen faucet cartridge fit every Hansgrohe faucet?
No. Hansgrohe uses different parts across its faucet models and product families. A cartridge’s brand or general description does not establish compatibility. Verify the exact model, part number, and manufacturer fit information before ordering.
✦ Wrapping Up
Conclusion
A Hansgrohe kitchen faucet cartridge can often be replaced without changing the entire faucet, but the right repair begins with an accurate diagnosis. A drip, stiff handle, or uneven stream may point to a cartridge problem, yet the aerator, supply valves, hoses, seals, and faucet body can also be involved.
Identify your faucet model, confirm the matching replacement part, and read the service instructions before removing anything. Shut off the hot and cold water, keep small parts organized, and install the cartridge without forcing it. Test the faucet carefully after restoring the supply and check for leaks both at the sink and beneath the cabinet.
If the cartridge will not come out, the shutoff valves are damaged, or a new cartridge does not solve the problem, pause and seek model-specific guidance. A careful diagnosis can help you avoid buying the wrong part or causing damage during a simple repair.
💡 Key Takeaway
Before buying a replacement, write down your Hansgrohe faucet model and confirm the cartridge part number through official parts information. Then gather the correct tools, shut off both water supplies, and follow the service instructions for that exact faucet.