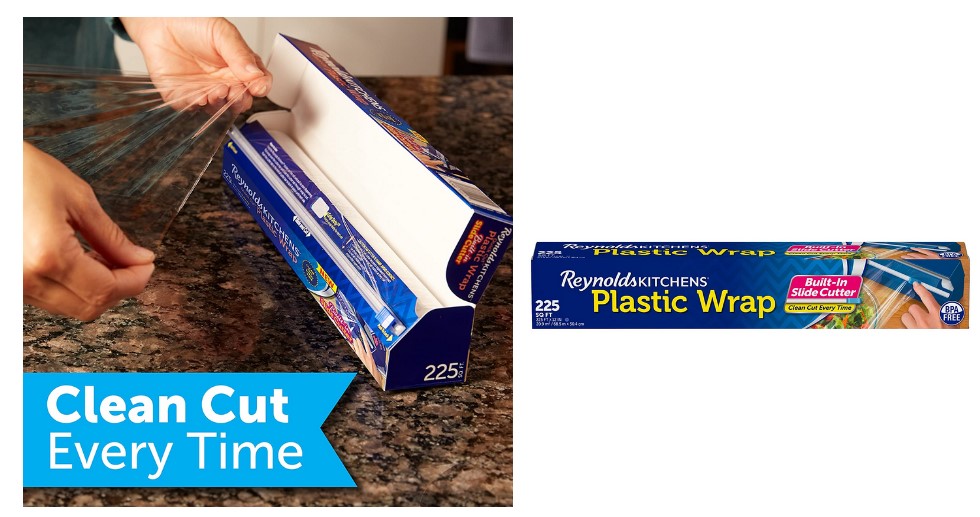
Reynolds Kitchens Quick Cut Plastic Wrap is a clear food wrap with a built-in sliding cutter. The 225-square-foot version measures 12 inches wide and 225 feet long. Its starter tab, roll holders, and grip strip help make wrapping leftovers and covering bowls easier. It is made from polyethylene and can be used for microwave reheating when the package directions are followed. It is not meant for cooking in an oven or other high-heat appliance.
In American homes, plastic wrap is a common tool for saving leftovers, covering bowls, and packing food for work or school. Yet a simple task can become annoying when the film sticks to itself, tears at the wrong spot, or slips back into the box. Reynolds Kitchens Quick Cut Plastic Wrap aims to make this job easier with a built-in slide cutter and a few small features that help keep the roll in place.
The main thing to know is how the cutter works and where the wrap can be used. The box helps control the roll, while the thin film clings to many smooth surfaces. It can help cover food in the fridge and protect some foods during storage, but it does not replace a tight-lid container or a freezer bag in every case.
This guide explains the product’s main features, how to cut and apply the film, what to check when it tears or will not cling, and how to use it with care. Product details can vary by package size and version, so check the label on your own box before use.
Reynolds Kitchens Quick Cut Plastic Wrap is a thin, clear film used to cover and wrap food. It helps limit direct exposure to air and can reduce spills, drying, and the spread of food odors in the fridge. The film is made from polyethylene, a type of plastic used in many food packaging products.
The feature that sets this version apart is its built-in sliding cutter. Rather than pulling the film against a sharp serrated edge, you draw the film across the dish or food, then move the cutter along its track. The cutter is designed to make a neat cut and lock in place when not in use.
The product is sold in different sizes and multipacks. A common single roll has 225 square feet of wrap, with a width of 12 inches and a length of 225 feet. Some listings show 200-square-foot rolls or bulk packs, so check the exact package before comparing price or value.
Source: gosupps.com
Film material
The wrap is made from polyethylene. Check the package for current product details and handling directions.
Built-in cutter
A sliding cutter runs along the box track and is designed to make cutting the film easier.
Starter edge
A marked starting tab helps you find the beginning of the roll.
Grip strip and end tabs
These parts help hold the film’s loose end and keep the roll in place as you dispense it.
What Does Quick Cut Mean?
Quick Cut refers to the box’s sliding cutter, not to a special way of treating the plastic film. You pull out the length you need and move the cutter across the track to separate it from the roll. This can help reduce uneven tears and the need to handle a separate cutting tool.
The cutter still needs proper use. Keep fingers clear of its cutting edge, follow the printed instructions, and lock it when you finish. If the cutter comes loose or the track is damaged, stop using it until the problem is resolved.
Best reason to use it
It can make repeated food-wrapping tasks less fussy, especially when you need short pieces throughout the day.
Key Features and What They Do
The main benefit of Reynolds Kitchens Quick Cut Plastic Wrap is the way its box and roll work together. Each feature has a small job: hold the roll, help you find the film’s edge, guide the cut, or keep the loose end ready for next time. These details matter most when you use plastic wrap often.
The design does not mean the film will cling to every surface. Its grip depends on the shape and texture of the dish, the amount of moisture on the rim, and how the film is applied. A smooth, dry bowl rim is often easier to cover than a rough or greasy one.
Sliding cutter
The cutter moves across the box track and is designed to separate the film with a clean cut. It can help limit ragged edges, though correct use still matters.
Automatic end tabs
These help hold the roll inside the box, reducing the chance that the roll shifts while you pull the film.
Starter Edge tab
The marked tab helps you locate the beginning of the film instead of scraping at the roll with a fingernail.
Grip strip
The strip helps keep the loose end in a ready position between uses, so the next piece is easier to find.
Does the Cutter Reduce Waste?
A slide cutter may help reduce waste when it makes it easier to cut the right length. A clean edge can also make the next piece easier to handle. However, the amount of film saved depends on how much you pull out, how often you rewrap food, and whether you can use the piece you cut.
For a small cup, pull only enough film to cover the top and grip the rim. For a wide dish, allow extra film around the edges so you can press it down. Cutting a very large piece for every task can use more wrap than needed, even with a handy cutter.
Practical tip
Estimate the needed length before pulling the film. You can always draw out a little more before cutting.
Is It Easy to Store?
The cardboard box keeps the roll and cutter together in one place. Store it flat in a dry cupboard or drawer where the track will not bend. Avoid placing heavy items on top of the box, since a crushed track can make the cutter harder to move.
Keep the box dry
Moisture can weaken the cardboard and affect how well the roll stays aligned.
How to Use Reynolds Kitchens Quick Cut Plastic Wrap
The basic method is simple: set the box on a stable surface, find the film’s edge, pull out the amount you need, and slide the cutter across the track. The film is easier to manage when the box stays still and the roll feeds out in a straight line.
Before the first use, read the package directions and check that the cutter is seated in its track. Do not force a stuck cutter or try to use a damaged cutting part. A steady motion is usually more useful than pulling hard on the film.
Step 1: Set up the box
Place the box on a flat, dry surface. Make sure the sliding cutter is fitted correctly and can move along the track.
Step 2: Find the film’s edge
Look for the marked starter tab. Lift the film gently so it does not split or fold back onto itself.
Step 3: Pull out the needed length
Hold the box steady and draw the film over the food or container. Leave enough extra film to reach the sides of the dish.
Step 4: Cut the film
Move the cutter along its track as directed on the box. Keep your fingers away from the cutting edge.
Step 5: Seal and store
Press the film against the outer rim of the container where it can cling. Return the loose end to the grip strip and lock the cutter if the design calls for it.
How to Cover a Bowl
Choose a bowl with a clean, dry rim. Pull enough film to cover the opening and extend past the edge. Place the center of the film over the bowl, then press the extra film down around the rim to help it stay in place.
Do not stretch the film so hard that it tears. If the bowl is wet or greasy around the edge, dry it first. A lid may be a better choice when the bowl has an uneven rim or needs a firm seal for transport.
Check the seal
The film should cover the opening without large gaps. If the edges lift, use a better-fitting cover or a container with a lid.
How to Wrap Small Food Items
For a sandwich half, cut a piece that covers the food with some overlap. Fold the film around the sides and press the layers together. For cut fruit or cheese, wrap the piece snugly and place it in a suitable food storage container if it needs more protection.
Do not assume a loose layer of plastic wrap is airtight. For foods that need a stronger barrier, use a sealed container or a bag designed for food storage.
Use only what you need
Short, planned pieces are easier to handle and can help limit excess film.
Best Uses for Plastic Wrap in the Kitchen
Plastic wrap is most useful for covering food in the refrigerator, keeping prepared items from drying out, and reducing contact with other items. It works well for many bowls and smooth dishes, though it is not the best storage choice for every food or task.
Use clean film each time you wrap a new item. Do not reuse a piece that has touched raw meat juices, dirty surfaces, or food that may carry germs. A fresh piece is a simple way to reduce the risk of transferring germs between foods.
Source: midwestcouponclippers.net
Covering leftovers
Cover a bowl or dish once the food has cooled enough for safe storage. Refrigerate perishable leftovers promptly rather than leaving them at room temperature for long periods.
Protecting cut produce
Wrap cut fruit or vegetables when the film fits the shape. Store them in the fridge and use a container if the food may leak or be crushed.
Covering dough or a bowl during prep
A film cover can help limit drying while dough or other ingredients rest. Follow the recipe’s temperature and timing instructions.
Packing food for a short trip
Wrap sandwiches or snacks to help keep them together. Use an insulated bag and cold packs when the food needs to stay cold.
Reducing fridge odors
A close cover can help limit the spread of food odors. For strong-smelling foods or liquids, a container with a tight lid is often more dependable.
When a Different Storage Method Is Better
Plastic wrap is a cover, not a full substitute for every type of food packaging. A rigid container protects soft food from being crushed, while a freezer bag can be easier to seal around oddly shaped items. A lid may also work better when a dish will be moved or stacked.
For long freezer storage, plastic wrap alone may not protect food as well as a suitable freezer bag or a wrap-and-container combination. Air can reach gaps in a loose covering, which may lead to dry spots or freezer burn. Use packaging intended for freezer storage when quality matters over time.
Use a lidded container
Choose one for soups, sauces, food that may spill, or items that will be stacked.
Use freezer packaging
Choose a freezer bag or suitable freezer wrap for longer storage and better protection from air.
Use foil for oven cooking
Plastic wrap is not suitable for conventional oven heat. Choose a material rated for the cooking method.
Is Reynolds Kitchens Quick Cut Plastic Wrap Microwave Safe?
The manufacturer states that Reynolds Kitchens Quick Cut Plastic Wrap has been tested to meet FDA standards for microwave reheating. That does not mean it is suitable for cooking food or for every microwave task. Follow the product directions closely, since heat and steam can cause the film to soften or melt.
The manufacturer’s instructions say to cover a microwave-safe container, leave at least one inch between the wrap and the food, turn back one corner to vent steam, and reheat for no longer than three minutes. Foods high in fat or sugar can become very hot and may melt the film. Take care when removing the cover because hot steam can escape quickly.
Never let the film touch the food during microwave reheating. If the food rises, bubbles, or splashes toward the wrap, stop the microwave and use a safer cover or container. Do not use this plastic wrap in a conventional oven, toaster oven, grill, stovetop, or other appliance where it may be exposed to high heat.
Use a microwave-safe container
The container itself must be rated for microwave use. Do not use the plastic wrap to make an unsafe dish suitable for heating.
Leave a one-inch gap
Keep at least one inch between the wrap and the food while reheating.
Vent one corner
Turn back one corner so steam can escape rather than building up beneath the film.
Limit reheating time
Follow the manufacturer’s limit of no longer than three minutes and stop sooner if the food is overheating.
Handle hot covers with care
Keep your face and hands away from escaping steam and remove the wrap slowly.
Why Can Plastic Wrap Melt?
Plastic wrap can soften or melt when it reaches temperatures beyond the conditions it is designed to handle. Food with a high fat or sugar content can become very hot during reheating, even when the rest of the dish seems less hot. Direct contact with hot food can increase the risk of damage to the film.
If the wrap has melted, warped, or torn during heating, stop using it and follow the package guidance for handling the affected food. Do not keep using damaged film. When in doubt, reheat food in a suitable microwave-safe container with a cover designed for that purpose.
Never use it to cook
The stated use is microwave reheating under the listed limits, not cooking or high-heat baking.
How to Fix Common Plastic Wrap Problems
Most problems with plastic wrap come from the way the film is pulled, the condition of the box, or the surface being covered. Check the simplest causes first. If the cutter or track is damaged, stop rather than forcing the parts to work.
A neat cut starts with a stable box and a film edge that feeds out straight. When the roll shifts, the film may bunch or tear. A clean, dry rim also gives the wrap a better chance of staying in place.
The film will not start
Look for the marked starter tab and lift it gently. Avoid digging into the roll with a knife or other sharp tool.
The film sticks to itself
Pull the layers apart slowly and keep the loose film from folding back onto the roll. If the piece becomes badly tangled, cut away the damaged section only if the cutter works safely.
The cutter will not slide
Check whether the film is bunched around the track or the box is bent. Do not force the cutter, and do not use the box if its cutting part is loose or damaged.
The film tears before the cut
Pull more slowly and keep the film aligned with the box. Avoid sharp sideways pulls that can split the thin plastic.
The wrap will not cling to the dish
Dry the rim, smooth the film over the opening, and press the edges down. Use a lid when the dish has a rough rim or the wrap keeps lifting.
The roll moves inside the box
Check that the end tabs are set as intended and the roll sits in the box correctly. Replace a damaged box rather than trying to repair the cutting track with makeshift parts.
When Should You Stop Using the Box?
Stop using the cutter if it separates from its track, will not lock, or has a broken part. A loose cutter can create a cut or choking hazard, especially in a home with young children. Follow the package warning and discard loose cutter parts safely.
Do not let children use the cutter without responsible adult supervision. Store the box out of their reach, and keep the cutting edge protected when the wrap is not in use.
Safety check
A cutter that is secure, moves as intended, and locks correctly is ready for normal use. A loose or damaged cutter is not.
How Much Wrap Do You Get, and Is It Good Value?
The best way to compare plastic wrap prices is to look at the cost per square foot rather than the shelf price alone. A larger box may cost more but provide more film. Compare the same package size and check whether the listing is for one roll or a multipack.
For the common 225-square-foot roll, the listed size is 12 inches wide by 225 feet long. That gives 225 square feet of film before accounting for any wrap that is wasted or discarded. A 200-square-foot roll contains less film, so its lower price is not automatically the better deal.
Step 1: Check the total area
Use the square-foot figure printed on the box or listing. Do not confuse the length in feet with the total area in square feet.
Step 2: Check the number of rolls
For a multipack, multiply the area of one roll by the number of rolls to find the total amount.
Step 3: Calculate unit cost
Divide the total price by the total square feet. A lower cost per square foot means you pay less for the same amount of film.
Step 4: Consider how you use it
A slide cutter may be useful if you wrap food often. If you use plastic wrap only once in a while, a lower-cost option may suit your needs better.
A Simple Price Comparison
For example, suppose one 225-square-foot roll costs $5.00. Divide $5.00 by 225 and the cost is about 2.2 cents per square foot. If a 200-square-foot roll costs $4.50, its cost is 2.25 cents per square foot. In this hypothetical example, the larger roll offers slightly better value per square foot, even though its total price is higher.
Actual prices and stock vary by store, region, and date. Check the final checkout price, shipping fees, and roll count before deciding. A bulk pack can be useful for a busy household, but only if you have dry storage space and will use the rolls before the packaging becomes damaged.
Do not compare shelf price alone
Use the same unit for each option and include any extra costs that apply to your purchase.
Reynolds Quick Cut Plastic Wrap Compared With Other Options
Reynolds Quick Cut is mainly a food wrap with a cutter built into its box. Other plastic wrap products may use a tear edge, a separate cutter, or a different dispenser. The most useful choice depends on how often you wrap food and whether easy dispensing matters more than the lowest price.
Plastic wrap also serves a different purpose from foil, parchment paper, wax paper, and reusable containers. These items should not be treated as direct substitutes for every task. Heat limits, food type, shape, and storage time all affect the best choice.
Versus basic plastic wrap
Quick Cut adds a sliding cutter and roll-holding features. Basic wrap may cost less, but the box design and ease of cutting vary by product.
Versus aluminum foil
Foil is often suited to oven use when the foil and recipe directions allow it. Plastic wrap is not suitable for conventional oven heat.
Versus parchment paper
Parchment is commonly used for baking when the product is rated for the required temperature. It does not cling around a bowl like plastic wrap.
Versus reusable containers
A container with a lid can protect food from crushing and spills and may be used repeatedly. Plastic wrap is flexible and takes up little storage space, but it is generally discarded after use.
Versus freezer bags
Freezer bags can close around food and offer a practical barrier for storage. For longer freezing periods, choose packaging designed to limit air exposure.
Who May Find Quick Cut Useful?
This product may suit people who cover bowls, pack lunches, or wrap leftovers several times a week. The sliding cutter can make repeated use less awkward, and the starter tab can help when the film edge is hard to find.
It may be less useful for someone who rarely uses plastic wrap or prefers washable containers for most food storage. If the wrap does not fit your dishes well, a lid may save time and reduce waste.
A practical match
Choose it if the cutter and easy-start features solve problems you often have with food wrap.
A reason to choose another option
Choose another method if you need oven-safe coverage, a strong spill-proof seal, or reusable food storage.
Food Safety, Handling, and Environmental Limits
Use plastic wrap only for tasks allowed by its package directions. The manufacturer describes this wrap as BPA-free and made from polyethylene. Those details do not mean the product can withstand every temperature or be used in every appliance.
Keep raw meat, poultry, seafood, and their juices away from ready-to-eat food. Use a fresh piece of wrap for each task and wash hands and work surfaces after handling raw ingredients. If the film has touched a contaminated surface, do not reuse it to cover clean food.
Plastic wrap is generally designed for single use. Reusing film can be a poor choice when it is dirty, torn, stretched, or has touched raw food. Follow local waste rules for disposal; do not assume that ordinary food wrap belongs in curbside recycling.
Check the food contact directions
Use the film as directed on the current package, especially for reheating and storage.
Avoid high heat
Do not use it in a conventional oven, toaster oven, grill, or on a stovetop.
Keep it away from children
Thin film and loose cutter parts can pose hazards. Store the box securely and supervise children around the cutting tool.
Dispose of used wrap properly
Follow your local waste guidance. Food-soiled plastic film is not accepted by every recycling program.
Does BPA-Free Mean Heatproof?
No. BPA-free means the product is made without bisphenol A as described by the manufacturer. It does not mean the film is safe for unlimited heat or direct contact with hot food during cooking. Temperature limits and intended use still matter.
For microwave reheating, follow the exact limits given for this product. For oven cooking or other high-heat tasks, use a material specifically intended for that purpose.
Remember the difference
Material information and heat-use instructions answer different questions. Check both before use.
Frequently Asked Questions
Q
What size is Reynolds Kitchens Quick Cut Plastic Wrap?
A common version contains 225 square feet of wrap that is 12 inches wide and 225 feet long. Other sizes and multipacks are also sold, so check the label or product listing to confirm the amount you are buying.
Q
Can Reynolds Quick Cut Plastic Wrap go in the microwave?
The manufacturer permits microwave reheating under specific conditions, not cooking. Cover a microwave-safe container, keep at least one inch between the wrap and food, turn back one corner to vent steam, and reheat for no longer than three minutes. Avoid overheating, especially with foods high in fat or sugar.
Q
Can I use this plastic wrap in the oven?
No. Do not use Reynolds Kitchens Quick Cut Plastic Wrap in a conventional oven, toaster oven, grill, or on a stovetop. High heat can cause the film to melt. Use an appropriate oven-safe material instead.
Q
Why will the plastic wrap not stick to my bowl?
The rim may be wet, oily, rough, or uneven. Dry the rim, place the film over the center, and press the edges down. If the film still lifts or the dish has an irregular shape, use a lid or another suitable cover.
Q
How do I cut Reynolds Quick Cut Plastic Wrap?
Pull the film from the roll and across the item you want to cover. Use the built-in sliding cutter along its track as directed on the box, keeping fingers away from the cutting edge. Lock the cutter when finished if the package design provides that feature.
Q
Is Reynolds Kitchens Quick Cut Plastic Wrap BPA-free?
The manufacturer identifies this product as BPA-free and states that it is made from polyethylene. Check the package for the current product information and follow the stated temperature and food-use limits.
Q
Can I freeze food wrapped in Reynolds Quick Cut Plastic Wrap?
Plastic wrap can be used as part of food storage in the freezer, but it may not provide the best protection on its own for long storage. A suitable freezer bag or another freezer-rated layer can help limit air exposure. Follow the food’s storage guidance and use packaging that fits the length of storage.
Q
How do I stop the wrap from tangling?
Keep the box on a flat surface, pull the film out in a straight line, and use the starter tab to find the edge. Avoid sharp sideways pulls. If the cutter track is bent or the cutter has come loose, stop using the box rather than forcing it.
✦ Wrapping Up
Conclusion
Reynolds Kitchens Quick Cut Plastic Wrap is designed to make common food-wrapping jobs easier. Its sliding cutter, starter tab, roll-holding end tabs, and grip strip help with dispensing and storage. The 225-square-foot version offers a useful amount of film for covering bowls, wrapping snacks, and storing leftovers.
The key is to match the wrap to the task. Use it for suitable food storage and follow the manufacturer’s limits for microwave reheating. Keep it out of high-heat appliances, use care around the cutter, and choose containers or freezer packaging when they offer a better seal or more protection.
💡 Key Takeaway
Before buying or using Reynolds Kitchens Quick Cut Plastic Wrap, check the roll size, inspect the cutter track, and read the package directions. For microwave reheating, leave a one-inch gap between wrap and food, vent one corner, and heat for no longer than three minutes.